Showing posts with label craftiness. Show all posts

Monday, 16 December 2013

Modified Haru

I know it seems a funny time to be crocheting with the temperatures being what they are, but I wanted to finish this little jacket. It's basically Doris Chan's Haru, but modified to be a shorter cropped bolero instead of a long cardie. It's good for balancing out the air conditioning at work.


I do like the long version, but basically I ran out of yarn. I bought this yarn last year in Berry when I was visiting missions over the Christmas break. I had crocheted a top but it turned out to be very unflattering, unfortunately something I couldn't predict until I saw where the stripe in the yarn ended up.


It's a pain, really, because you spend a long time on making something and when it doesn't work you feel like it's been a waste. But I love the colours in this yarn, and there was nothing wrong with the yarn itself, so I decided to repurpose it. Unfortunately, either the type of yarn or my stitches meant it was really hard to unravel. So I pulled as much of it apart as I could, but ultimately I didn't have enough to make the longer Haru.


The pattern was pleasing, as with most of Chan's patterns. The shell pattern is a lot more forgiving than a straight single crochet. The stripe is still a little weird - well, the really bright red one, it's the only one that's really obvious. But I actually don't mind the offset nature of it. I think when it gets a bit cooler I might make another Haru in the longer style.


Sorry about the lighting in the pics too...I meant to do it while there was still daylight but was so mashed after work I had to have a lie down instead.

Pattern: Haru by Doris Chan
Yarn: Riot DK by King Cole (colour 406)

Tuesday, 25 June 2013

Blankie

Cot blanket for Dormans by the procrastinatrix

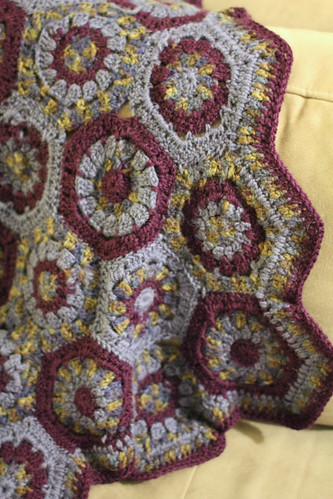
When going through my stash, I found a bag of hexagons I'd hooked up last year and not known quite what to do with. I had planned to make a blanket but ran out of puff. I had gotten as far as sewing a bunch together, but realised that I would need to make a gazillion more before it was adult blanket sized and I had gotten a bit sick of hexagons.

Then I realised I had just enough to make a sweet little pram blanket for some friends at church who are about to have their first baby. I sewed the last few hexagons on, did an edging in three rows of double crochet (which give it a slightly wavy effect) and voila!

Now, just waiting for the news that the bub's been born and I can give it to them!

Pattern: made it up, but used this post from Attic24 as a starting point.
Yarn: Lincraft Cosy Wool Yarn

Saturday, 9 March 2013

an imperative and a little red journal

I love making things, as you know. Sometimes I forget how much satisfaction making things can bring me, especially when I'm feeling down.

I was walking around Spotlight in Rockdale this morning and saw these words cut out of MDF and knew straight away what I could do with some of my washi tape. A 3D reminder to create, wrapped in six different washis is now perched atop my computer and I love it.


But that's not the best thing I made this week.


No, I didn't make this. This is a leather wrapped notebook I bought when I was on holidays years ago with my mum. We were in Florence, checking out little shops and eating gelato in almost freezing temperatures. We went into a tiny little stationery shop, which was stacked floor to ceiling with beautiful leather journals and books in rich colours. The man who owned the shop didn't speak English, but with the help of his wife (who didn't speak much more English than he), we managed to communicate and I learned he made all the books in an upstairs room and had been there for decades. The books weren't cheap, but I bought one and treasured it.

But no matter how many times I've tried over the years, I haven't been able to fill this notebook. It seems like the words within it ought to be important, not just the idle scratchings and thoughts of a sometimes-writer. Even when I was writing a lot, I would prefer less special books to scrawl in, and my red Florentine journal would just sit there, waiting.

The other day I was once more admiring Dodo Cases, but thinking I couldn't really justify buying a leather cover for my Kindle when I was more than able to make bags and things. If I put my mind to it, I thought I could probably make a leather book jacket, but I didn't know if I had the patience to do a good job. And I'd probably end up exploring a new craft and buying more materials that I really didn't need.

I read the description of the product and it mentioned that the Kindle is held in place with resuable adhesive, which reminded me of the double-sided Scotch restickable tabs I bought recently for another project. And I admired the art behind the line of copy that made me long for one of these cases: "Handmade in our San Francisco bookbindery by true American craftsmen and women" - I love unique things, handmade things, things whose every stitch and curve and cut has been rendered by one person's hands.

Then I remembered the Italian bookbinder and the little red journal.


I grabbed the journal off the shelf and held it up. It was the exact same height as the Kindle. Exactly. With surprisingly little remorse (for what use is it to keep an almost-empty notebook just for the sake of its cover?), I carefully cut the notebook out. I used some of the restickable tabs to mount the Kindle onto the endpaper/pastedown, which had remained stuck to the leather. (The restickable tabs are amazing things. They're clear and very sticky and if they lose their stickiness you just wash them and they're sticky again. Brilliant!)


Et voila! Or, because of the Italian origins, should I say, ecco? (I had to look that up) A bespoke beautiful object with a strong memory behind it, fusing the old and the new. It protects, it feels lovely, and I am finally using something I bought 14 years ago.

And so, my friends, create! It brings great joy!


Saturday, 9 February 2013

washiiiii

I was very excited to get an email this week from Natalie at Creme de la Craft, telling me I'd won a competition for $100 worth of washi tape from Freckled Fawn! I had completely forgotten I'd even entered the comp, as I rarely win anything. What a wonderful email to get, and a generous prize. Thank you, Natalie and Freckled Fawn!

Washi tape is delightful, but a frivolous thing to spend money on (although since when has that mattered to a crafter?*). So having $100 to buy whatever I like was just bliss. I am so looking forward to my parcel arriving...


...and then nothing will be safe! As well as cards, I've already washi-ed my desk, the cracked fridge handle, a flash hood I just made from leftover plastic...


What else can I washi?

* when I told her about my prize, mum said, "but aren't you doing the Stash and Treasure market next week to get rid of craft stuff?" I said, "Hush. That's not the point."

Wednesday, 16 January 2013

moving auto-style

I know it matters little, but I've moved back to blogger. I just got fed up with my wordpress site getting hacked and not understanding or caring enough to keep on top of things. My move back wasn't entirely painless - I've lost all my comments and photos. There was probably a better way to fix it but as I said, care factor = very low. I fixed the photos on the first few posts so that it doesn't look completely rubbish  and I'll get around to the rest sometime. I'll put my craft posts up here too rather than keeping a separate site for that, because although I had some plans for the other site, I just don't have the energy to do anything with it.

I hate feeling inept about web stuff, but I have to accept that it is not a bad thing to use the tools that make life easier, instead of trying to control and modify everything! It's a bit like driving an auto versus a manual...yeah, it might give you more control and whatever driving a manual, but really, the auto gets me where I need to go with a lot less stress.

Tuesday, 8 January 2013

Rachel's in-between cardigan

I've decided this is an in-between cardie because it will be useful in autumn when it's not quite cold but a little chilly. I worked on this cardie in full view of its recipient and all the while she thought I was making it for myself...bwa ha ha...I was happy on Christmas day when mum unwrapped her present and was surprised!


Though it wasn't entirely without angst...I thought I had been very careful with counting rows and whatnot but when it came time to sew the cardigan up I realised one side of the front was longer than the other. Whoops! I didn't have time to do anything about it, and really, I probably wouldn't have anyway. I lined up the lace pattern at the bust, and then the excess fabric at the top I turned over into an asymmetrical collar and sewed buttons onto it.


Mum did have a bit of trouble lining up the buttons, but when I gave her a tutorial (line up the edge between the solid bit and the lace bit) it was all good!

Also I did take photos of her on Christmas day modelling it, but then accidentally deleted them so here I am, showing off. :)


Yarn: Bendigo Woollen Mills Classic 8 Ply in sweet pea
Pattern: based on the imaginatively named Crochet Cardigan by Patons with accidental adjustments by me

Saturday, 29 December 2012

Hatter's Hope: sparkle

Hello! Happy period-between-Christmas-and-New-Year! This time is always a bit of a blur for me; I never remember what day it is, I rarely do anything before midday, I have trifle for breakfast every morning...in short, it's proper holiday time!

It also means I have time to post - I meant to do this last week but it got sucked into the Christmas vortex.

The current challenge over at Hatter's Hope is sparkle (why don't you give it a go?). For this one I got out my embossing powders, which I haven't used for a while. So I thought I'd show you how I use them!


These are my embossing powders. I've got sparkly ones, black ones, and metallic ones. The black powder is best used with stamping rubber stamps on an embossing ink pad; the finished result gives you raised lines you can colour inside and a shiny outline to your image. The metallic ones are good for outlines, or having solid blocks of gold or silver. The glitter ones are good for things like this sparkle challenge!

So first of all I coloured up Sammi's Fairy Set. The digi has her fairies, LilyRose and Charlotte Rose, in two sizes, so I did the bigger ones in foresty greens and purples, and the little one in a red dress - like a forest berry perhaps?


Then I coloured in their wings and the little one's red dress with the clear embossing ink. I have a pen for this purpose - looks a little Copic-like with the double ends. I wondered whether the ink would change the colours of the Copics I'd used, but it didn't change too drastically.


You only need a tiny amount of powder to cover the image, but it's hard to be precise. So the best way of doing it is to pour the powder over the whole image, then tip the excess onto a card and pour it back into the container. I've used these powders a lot in the past and haven't had to buy refills yet - they go a long way! Once I've shaken the excess off, I brush over the parts of the image I don't want to be embossed with a small, soft paintbrush, just to loosen any stray particles and give the embossed bits a clean edge.


Lastly, you heat up the paper to melt the powder, which sticks it onto the page and gives it a shiny finish. You can use any heat source that won't burn the paper; I used to use a toaster to heat it from underneath, which was quite effective. I do have this heat tool, which blows very hot air but a bit more directed than a hair dryer. You have to be careful if using something like a hair dryer, that the powder doesn't come unstuck and blow off the page. That would leave you with a very blotchy result.

And this is how they look after their heat setting!


Much less messy than using glitter and glue, as the glitter doesn't fall off once it's been heat set.

Then I put the card together, with the fairies sitting in a tree, daydreaming. I used some cloud stickers and sentiment from a kikki.K sticker book. Now I have it sitting on my bookshelf and I feel quite pleased when I see it as I come down the hall to my room!


Sunday, 23 December 2012

Magnolia blanket

This isn't a newly finished project, but I realised I never put pics up of the end result and it's all been papercraft here for the last few posts so it's high time we had some yarn craft. Here's my magnolia afghan! It's been keeping me warm since April, and even when the weather is warmer it looks nice draped over the end of my bed.


It's a very easy pattern for a very satisfying result. You basically crochet the large shapes, then the smaller triangles and sew them all together into one long panel. Then you crochet along one side and keep going until it's as long as you want (or, in my case, until you get sick of doing nothing but long, long rows).


In the pattern, the top panel was supposed to be vertical rows, but I preferred the horizontal stripe, so I just did the same as on the bottom panel and crocheted along until it was as I wanted. Then I went all around the edge in double crochet stitches to bind it.


I love the yarn I used too, as it self-stripes and makes the blanket look a whole lot more complex than it actually is! Also, being Lincraft yarn it often goes on sale, so I would just wait until there was a sale and buy up a bunch. Seeing as it has a mixed colour it didn't matter too much if the yarn wasn't from the same dye lot (there wasn't a lot of variation as far as I could tell).

I probably would have finished the whole thing quite quickly if I hadn't started it in spring...but crocheting a giant blanket in summer was not the most enjoyable thing to do so I waited until the autumn months to finish it off. It gives me great pleasure to see it on my bed! There is really nothing quite as satisfying as making something beautiful that is also practical.

Yarn: Lincraft Surprise - dark multi mix
Pattern: Magnolia Afghan by Lion Brand Yarns

Hatters Hope: the Magical Tree

There's a new release at Hatter's Hope, inspired by Enid Blyton's The Magic Faraway Tree! These were definitely my favourites of her books...I didn't really like the Famous Five or the Secret Seven or the Egregious Eight (okay I made that last one up). But The Magic Faraway Tree was somewhere I wanted to go, with its silly folk and yummy-sounding snacks and the amazing places it led to.

Sammi obviously loved those books too! Her range of stamps include the Silk Fairy, Pan Man, Mr Moonhead and assorted fairies and mushrooms. I chose the Silk Fairy with her long, golden hair to colour - mainly because she has the snacks! I decided to colour her in a bright, storybook style.


Unfortunately when I was putting the card together, I was very tired after a long week of work and carols and busyness. I just couldn't get it to look how I wanted. I wanted to do a kind of woodland-feeling card but of course hadn't used the right colours for that, the birds washi tape didn't look strong enough, and the oak leaves I punched out with my hole punch looked a bit messy and so I started pulling it apart and...well, the card actually no longer exists in this form anymore. It has been reduced to its component parts and awaits a time when I have a bit more creative energy!

PS. I came across this 2006 article talking about the 'sanitising' of Blyton's books. I agree with the article's author: "it is all palpable madness".

Sunday, 25 November 2012

Hatter's Hope challenge: Bring on the bling


Here's Poppy! And as if I needed a challenge to use bling on a card. The sentiments and the snowflake paper are from a book of papers by Kaisercraft.

I think Poppy is my favourite of the Hatter's Hope Christmas gang. She has such a sweet face!

Why not join the challenge over at Hatter's Hope? You could win the very first rubber stamp produced by HH!

Saturday, 24 November 2012

Hatter's Hope

So I've mentioned her a few times; Sammi is one of my (few?) readers and a close friend. As well as being the boss lady at Mad for Markers, tonight marks the launch of Sammi's own range of stamps under the label Hatter's Hope. Her drawings are whimsical and sweet (a bit like their creator) and are manga- and/or storybook-inspired. I also like that she has some more Australian-themed Christmas designs!

Congratulations Sammi! I'm really proud of you!

If you're a papercrafter, be sure to pop over to Hatter's Hope, join in the regular challenges using HH stamps (the first challenge kicks off tomorrow), and buy an image or two!

Friday, 23 November 2012

The light


Here's another Kaylee from Some Odd Girl, this time a digi (digital 'stamp' = an image you print off yourself on a printer, rather than a physical stamp you'd stamp with ink) called Bright Lights Kaylee.


I think I like her with blue hair the best (maybe because I coloured the blue better than the pink!).

I used some of the excellent washi tape I got recently at the Papercraft Festival at Penrith when I went in to help Sammi on the Mad for Markers stand. We were right across from the Papercraft Hub stand, and they one whole 'wall' of their stand was just rolls of washi tape (a kind of Japanese paper tape) in all kinds of patterns. The temptation proved too much!


I love the informal yet sweet look washi tape gives to cards (I remember first seeing washi tape in Pentimento Bookshop in Newtown years ago, and coveting it desperately but thinking "when would I ever use that? I really can't justify buying it just because it looks pretty." It was quite expensive too, but now it's far more common and much cheaper and I need less and less justification to buy pretty things!)

I printed out an appropriate Bible verse to stick on - Jesus is the light that came into the world at Christmastime (and of course it's also a lame pun because, well, fairy lights). I don't like a lot of the 'sentiment' stamps that are around at Christmas, mainly because they're so bland and generic. As a Christian I love to celebrate Jesus' birth so I am pleased to take the opportunity to say more than 'Merry Christmas' or (worse) 'happy holidays'!


PS - hopefully it doesn't seem too condescending if I occasionally explain a term...it's easy to just use jargon and forget that not everyone will know what things like digis and washi tape are. I mainly am aware of this because that's how I feel whenever I start exploring a new craft and I'm too scared to ask questions!

It took me SO long to feel familiar with crochet patterns, for example, and I was always thinking I was doing everything wrong. But eventually I realised that even if the way I did it wasn't 'right', it was still getting good results! Starting to get back into paper craft has been a bit of an eye opener, because there are a lot more commonly available tools and different techniques around than when I used to run Christmas card making workshops at church...I suppose the images I made up and printed out to use were digis, but I didn’t know that’s what they were called!

I think we get hung up on right and wrong ways of doing things and forget about the joy of just making stuff! A lady at the Papercraft Festival was watching one of the girls colouring and said wistfully, "I used to love colouring in with my son when he was little. We had so much fun! But I'm so not artistic, I could never do anything like this." I said, "Artistic has nothing to do with it! If you enjoy it, that's one of the biggest reasons for doing it!" That's advice I would do well to heed myself sometimes...


Wednesday, 21 November 2012

Organisation is a beautiful thing


Thank you to Virginia for dropping over my new Copic wallet. No more rummaging in a box for my pens and never being able to find the right colour! (the rummaging worked okay when I only had a few markers, but as one gets deeper into a craft, all the surrounding paraphernalia starts to make sense...)

Sunday, 18 November 2012

Not quite perfect...


Another Tree Trimming Kaylee card, but this time with purple hair. Purple and red is one of my favourite combos!

[side note, I have often wished I had purple hair but have been put off by the thought that I would have to peroxide it first. Why regular toxic hair dye isn't a problem for me, I don't know. But I have visions of my peroxided hair becoming straw-like and crumbling to dust and I don't think I could rock the bald look AT ALL.]

This card didn't work out as well as I'd hoped, but hey I'm not just going to post the stuff here that makes me look like I know what I'm doing. Full crafting transparency, people! I also wanted to show how just a different colour palette can transform an image; I keep forgetting this is the same stamp as the one on the last card.

The coloured baubles (a Kaisercraft clear stamp that I can't find anywhere to link to online so it must be out of 'print') are fine, but I wanted to echo their shape in the background by stamping with red ink onto the red card. As you can see, that didn't quite come out as clearly or as elegantly as I might have liked! I might try it again sometime, but I'll practice first.

But still, there's something about this card that pleases me. Must be the purple hair.

Tuesday, 13 November 2012

Merry and bright


I love, love, love sticking things on cards. Wait. Let me be more specific. I really like stick on gems and pearly things, which I guess are collectively referred to as bling (even though I never really liked that word...not really sure why...but I guess I have to learn to love it, it seems to be here to stay!). I found these really cheap red and green pearls at a Hot Dollar store - the reason they're cheap is because the adhesive is terrible and comes off all over the backing paper. But no matter. I still got them to stick.

I also bought a giant pack of coloured card at Costco (that's a good tongue warmer upper...try saying it several times fast if you need to do some public speaking) so I've been enjoying cutting card sizes that aren't 'standard'. This is a long narrow one that stands on its end, opening up rather than out. And I cut the edge with my crinkly scissors that I think I've only used one other time ever. What a wise purchase that one was.

But the star is, of course, is Some Odd Girl's Tree Trimming Kaylee stamp, coloured with my trusty Copics. I really like Some Odd Girl's style - the characters always look so cheerful! (Although a male friend thought Kaylee was holding a bomb...I think the wire at the top of the bauble looks like a wick because it was too hard to cut around and I thought I was using my 0.2 multiliner to redraw it but it turned out to be the 1.0. Whoops!)

May your days be merry and bright!

Sunday, 11 November 2012

Colour


I've always loved coloured pencils, pens, crayons, pastels, mainly how they look all lined up. The possibility of what someone could do with all those colours.

So I was very excited when my lovely friend Sammi set up her store, Mad For Markers. A close source of colour goodness! Mad For Markers came out of Sammi's love for Copic markers, an alcohol-based, refillable marker from Japan that allows you to do a lot of fun stuff with blending and shading that you can't do with normal markers.


[caption id="attachment_128" align="aligncenter" width="491"] Me and Sam at a recent event our church, Wild St, was part of (we were colouring Christmas tags and, er, wearing silly hats)[/caption]

I coloured my comics for Kinds of Blue (Labyrinthine and Eating the Blues) with Copics, but I'd only just started playing with them and wasn't very artful in the way I used them. Looking at the pages now I wish I could do them again, but they're out there now, and c'est la vie. I just need to draw some more comics to give me a chance to do a better job, I guess!

I decided this year I would make a whole stash of Christmas cards to get some good use out of my markers, and to encourage me to do more little creative things. I'm still working on a crochet project, but it takes me longer to finish those. The nice thing about colouring and cards is I can finish something I'm reasonably happy with in a short time. Sense of accomplishment, hurrah!

Here's one I made for mum's birthday in October:


I'll be putting up Christmas ones in the next few days, to engender a sense of Christmassy spirit, despite it only being November (when you intend to make things to give at Christmas, you have to start early!).

Sunday, 30 September 2012

All shawls

These shawls are super easy and lovely to crochet. The beauty of this pattern is it can be made with just about any yarn/hook, and Doris Chan provides examples of the different outcomes in her pattern.


I made one for myself in red and purple, and realised that by crocheting around the edge I had effectively bound the piece, so it doesn't stretch that much (I'm sure all experienced yarn workers are going "duh" right now, but it honestly didn't occur to me). It has come in handy when I've gone to the movies, or been caught under the icy air conditioning at work, or even just snuggling up on the couch at home. It's surprisingly warm!


The blue one I made for my colleague, Lynette, who has just gone on maternity leave. I thought it might be good to drape around her shoulders as the seasons change from cold to hot and back again in the space of 24 hours, especially when she'll be up at ungodly hours of the night feeding. I finished it a few weeks ago but only just got around to blocking it today.


Didn't ever think I'd get into making shawls, but after this one I'm...(no she's not going to say it, is she?) hooked (Yes I went there. I am a consummate dad joker).


Yarn:

red shawl - Bendigo Woollen Mills Rustic - Radiant, Lincraft Cosy Wool - purple

blue shawl - Bendigo Woollen Mills Luxury 10 ply - junior navy and blue denim

Pattern: All Shawl by Doris Chan

Sunday, 29 July 2012

Megan sweater

You'd be forgiven for thinking I'd stopped making anything, the way this blog has been gathering dust. But I've been happily crocheting through the cooler months, finished my magnolia blanket, which I will post later and finished my very first garment!


It's the Megan sweater by Robyn Chachula, from the book Blueprint Crochet. I decided to use this one because I wanted to learn how to read crochet diagrams, and it's my kind of sweater, really. And as it doesn't really get that cold in Sydney, it's a perfect weight for this climate.

I had no trouble with the pattern itself; even though it looks complicated, it's actually pretty easy. You just make up a lot of motifs, then stitch them together. Not much more complicated than making a blanket.


Except. The sizing was a bit weird. I'm not sure what I did, but it ended up huge. I had measured myself and concluded I was an XL from the pattern's measurements, I did a gauge swatch...but still somehow it ended up making me look a bit like the marshmallow man. It came down to my knees and ballooned around the armpits.


I quietly despaired for a while, then thought "hey! I could just pull some motifs out and make it fit!" So I pulled some out and then despaired a little more loudly, because I thought I'd completely ruined it. It sat, in a jumble, on the couch for a week, a huge gaping hole where I had cut out a section. But I didn't want it to mock me forever. I was determined to solve this problem.


So, during another episode of the West Wing (it has been my primary viewing while making this piece) I pulled and eased and forced the garment to do what I wanted it to...and it worked! I am so happy...I was scared it would be a massive waste of time and money. I added some buttons, changed the shaping of the sleeves, and dispensed with the ribbed cuffs (I hate ribbed cuffs) from the original pattern. It's much more me this way.

So pleased that now I have something bright and colourful and snuggly and unique to wear.


[box] Yarn: Bendigo Woollen Mills Rustic - Radiant

Pattern: Megan sweater by Robyn Chachula[/box]

Friday, 27 January 2012

currently crocheting: wavy scarf


Mum gave me some delicious Noro Silk Garden sock yarn for Christmas. I started to try and crochet a pair of socks, but a) they were turning out weirdly and b) I remembered I don't really like mega chunky socks. So I pulled that apart and found this free wavy scarf pattern on Ravelry.

I love scarves. But even though crocheting a plain scarf is easy, it's a bit boring. This one has a pattern I can easily remember without having to refer to, but is interesting enough to keep me occupied and to show off the lovely colours of the yarn. It's lovely stuff to work with!

I'll put up a finished pic when it's, er, finished.

Thursday, 19 January 2012

Imogen's quilt

I haven't quilted for a while. This is a really simple one I made for my goddaughter, Imogen, in 2008. Her favourite colours at the time were, of course, pink and purple.

[gallery]

The fun part was choosing all the fabrics. There were ones with chocolates, some purple mice, garden scenes, lovely hyacinths, even a cartoon street scene. Each square has a little tie in the corner just for added interest, and I had read at the time that it was an old-fashioned quilting technique to secure all the layers together, rather than quilting a pattern as is often done (though the loft of the batting (the middle filling stuff) wasn't that thick, so it didn't take on that puffy look that I like).

It turned out beautifully and didn't take much time at all to run up, which is my favourite kind of project. Even nicer was the fact that my own godmother, Freda, helped me put it together (she is a prodigious quilter), so it felt resonant somehow.